Just unboxed an electric cigarette rolling machine — or about to? Here is the good news up front: using one is genuinely easy. Load tobacco, mount a tube, press the button, done. The reason so many first-week reviews say “it keeps jamming” is almost never the machine — it is three small setup habits nobody explains: tobacco that is too dry or too chunky, a crammed hopper, and a density setting nobody dialed in. Fix those three and your first session produces sticks that look store-bought.
This is the complete first-time operating guide: unboxing checklist, where to set up, the exact first-session sequence, what every setting actually does, your first-week expectations, the 30-second habit that prevents 90% of problems, and quick fixes for the classic beginner hiccups. Written for every brand — your manual has the model-specific details and always wins on conflicts. 👉
- The unboxing checklist
- Where to set up (it matters more than you think)
- Meet the five parts you will touch
- Supplies before you start
- Your first session, step by step
- What the settings actually do
- The first week: what to expect
- The 30-second habit that prevents 90% of problems
- First-week problems and quick fixes
- Safety notes worth reading once
- Common mistakes (and fixes)
- Pro tips
- FAQ
- The first-session checklist
The unboxing checklist
Before anything touches tobacco, five minutes of inventory saves a frustrating evening:
- Find the manual and actually open it. You need three model-specific facts: supported tube sizes, the jam-clearing procedure, and what (if anything) the maker says about lubrication. Photograph those pages — manuals vanish.
- Check the box contents against the manual’s list: machine, power cord or adapter, any included brush or tamping tool, spare parts. Missing pieces are a return-window issue — find out now, not in month two.
- Inspect the nozzle and hopper for shipping debris or plastic shavings; wipe with a dry cloth.
- Run one empty cycle. No tobacco, no tube — just power on and cycle once. You are listening for a smooth, even motor sound and confirming nothing grinds out of the box.
- Register the warranty if the maker offers it, and note the model number somewhere findable — you will need it for replacement parts one day.
Where to set up (it matters more than you think)
Electric injectors are small appliances with three placement needs:
- A stable, level surface. The machine vibrates during cycles; a wobbly side table walks it toward the edge. Kitchen counters and solid desks are ideal.
- Room for a tray. The machine sits on or beside a rolling tray — the tray catches every stray shred and turns cleanup into a ten-second sweep. Deep-dish trays exist precisely for injector setups.
- Away from heat, sun, and humidity. Not above a radiator, not on a sunny windowsill, not next to the kettle. The same enemies that ruin stored tobacco warp plastic guides and dry out sessions mid-batch.
One more placement thought: pick a permanent spot if you can. Machines that live in a cupboard get used less carefully than machines with a home — and a consistent station (machine + tray + jar + brush in one place) is what makes the weekly routine actually happen.
Meet the five parts you will touch
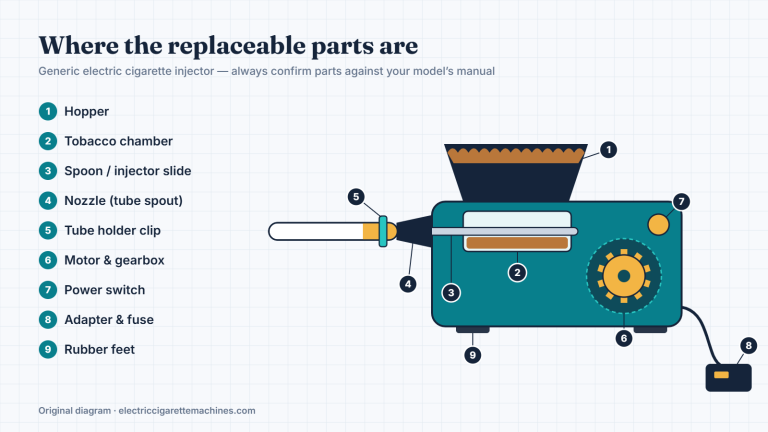
Names vary by brand, but every electric injector has the same five zones (interactive diagram in our jam troubleshooting tool):
| Part | What it does | Your job |
|---|---|---|
| Hopper | Holds the loose tobacco | Load level, never crammed |
| Feed slot / channel | Moves tobacco toward the spoon | Keep it brushed clean |
| Spoon / slider | Pushes a measured portion into the tube | Inspect for wear every few months |
| Nozzle / spout | Holds the tube during filling | Seat tubes snugly; pipe-clean weekly |
| Density control | Sets how firmly tobacco packs | Dial once per tobacco, then leave alone |
📦 The day-one supply list
Nothing kills a first session like a missing consumable. Four items, one cart:
- ✅ King-size filtered tubes: ZEN full flavor › — the universal starter size (tubes guide)
- ✅ Rolling tray › — prep surface + tobacco recovery (tray guide)
- ✅ Cleaning brush kit › — the machine’s life insurance
- ✅ Airtight storage jar › — keeps tobacco machine-ready (storage guide)
As an Amazon Associate, ElectricCigaretteMachines.com may earn from qualifying purchases.
Supplies before you start
The machine is useless alone. Day-one list: king-size filtered tubes (the universal size — check your manual before ever buying 100mm, and pre-flight combos in the tube checker), tobacco with a medium shag-style cut at proper moisture (the full equipment-side story is in our tobacco-for-machines guide — short version: strands like spaghetti, springs back from a squeeze in 2–3 seconds), a tray, a brush, and an airtight jar. Buy a small pouch of tobacco and one 200-box of tubes for the learning week; scale to cartons and bags once the machine has approved your choices.
Your first session, step by step
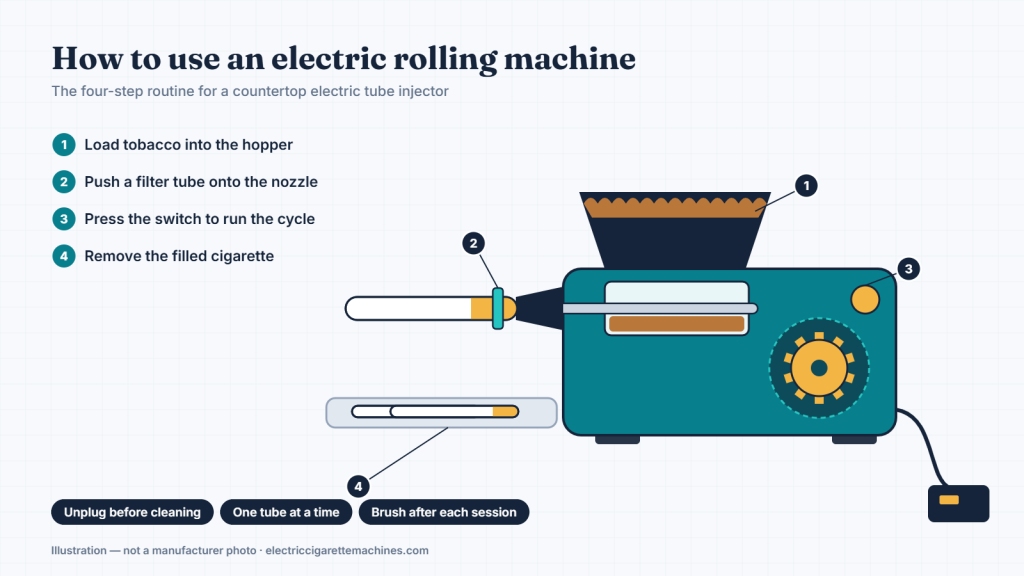
- Prep the tobacco (2 minutes). Spread it on the tray, break up clumps with fingertips, and pull out stems and hard bits — stems are the #1 first-day jam cause. Squeeze test: slow 2–3 second springback means go; crackling-dry or clumping-damp means fix moisture first.
- Load the hopper level. Fill loosely to the top of the chamber without pressing down. Cramming compresses the feed and starts jams; the machine does its own compacting downstream.
- Mount a tube. Slide a king-size tube onto the nozzle with a gentle twist until it seats snugly — about a finger’s width of engagement. Not loose (it will blow off), not crushed (it will wrinkle at the seam).
- Set density to the middle. Whatever the dial or setting range, start centered.
- Run the cycle. Press the button (or lever) with the machine flat on the table. One smooth cycle; the filled tube pushes onto the nozzle tray or your waiting hand.
- Inspect stick #1. Squeeze the tip, middle, and filter end. Loose or hollow tip → density up one notch. Torn paper or bulging seam → density down one notch. Then roll stick #2 and re-check.
- Dial in, then batch. When two sticks in a row pass the squeeze test, write the setting down (this is your recipe for this tobacco) and roll your batch — ten to twenty is a sensible first run.
- Close the session properly. Empty leftover tobacco back into the jar, tip the machine over the tray, tap, and brush the feed slot for 30 seconds. Done.
What the settings actually do
- Density (every machine has it). Controls how much tobacco the spoon packs per cycle. It is a per-tobacco recipe, not a per-session fiddle: dial it once for a blend, note it, and only re-dial when you change tobacco. Chasing it daily is the most common self-inflicted inconsistency — the full method lives in the perfect-stick system.
- Tube size selector (some machines). Switches the fill stroke between king and 100mm. Wrong position = hollow tips or overstuffed tubes. Check it matches your tubes every batch — it is the first thing to look at when a previously-good machine suddenly rolls badly.
- Speed settings (heavy-duty models). Slower speeds are gentler on delicate tubes and damp-ish tobacco; full speed is for dialed-in batch runs with proven supplies.
The first week: what to expect
Honest expectations prevent premature returns:
- Days 1–2: a few ugly sticks and maybe a jam while you learn moisture and density. This is tuition, not defect. Sticks 1 and 2 of every session are calibration pieces forever.
- Days 3–5: consistency arrives. Your recipe settles, hands stop hovering, and a stick takes seconds.
- Day 7: first standard clean — the 10-minute routine. Log it in the free maintenance tracker and let it email you the next reminder.
- Week 2 onward: batch weekly, store airtight, brush after every session. The machine becomes boring in the best possible way.
The 30-second habit that prevents 90% of problems
If this guide could teach only one thing: after every session, tip the machine over the tray, tap twice, and brush the feed slot. Thirty seconds. Tobacco dust and resin are what turn great machines into jam machines — a feed channel that never accumulates buildup never develops the problems that fill one-star reviews. Weekly and monthly routines matter too (the full schedule is here), but the post-session brush is the habit that carries the rest.
⚡ Still choosing your machine?
This guide works for every electric injector — but if you have not bought yet, start with the class that fits your volume.
| Most first buyers | Beginner-class electric injector |
|---|---|
| Pack-a-day+ | Heavy-duty class |
| Decision help | 60-second match quiz · full comparison guide |
Check the Powermatic 2 price on Amazon ›
As an Amazon Associate, ElectricCigaretteMachines.com may earn from qualifying purchases.
First-week problems and quick fixes
| Problem | Most likely cause | Quick fix |
|---|---|---|
| Loose, shedding sticks | Tobacco too dry | Squeeze test; 48h in a jar with a humidity pack |
| First jam | Stems / clumps / crammed hopper | Unplug, clear per manual, re-prep tobacco, load level |
| Tube tears at the tip | Cheap tubes or density too high | Try a premium tube box; drop density one notch |
| Hollow tip on every stick | Tube-size selector on the wrong position | Match selector to tubes; see the tubes guide |
| Tube blows off mid-fill | Under-seated on the nozzle | Seat with a gentle twist until snug |
| Sticks vary within one batch | Hopper running low; moisture drifting | Refill above one-third; keep pouch sealed between loads |
Anything persistent beyond these: the structured jam troubleshooting tool walks symptoms to causes interactively.
Safety notes worth reading once
- Unplug before every clean and every jam. Non-negotiable, worth repeating.
- Dry hands, dry machine. It is an electrical appliance; water belongs nowhere near the mechanism.
- Let a hot motor rest. After a long batch or repeated jams, ten minutes of cool-down protects the drive.
- Keep it away from kids and pets — both the machine and the tobacco. Nicotine is toxic to children and animals in small amounts.
- Personal use only. Rolling to sell crosses into licensed-manufacturer territory with serious federal penalties — details in the RYO starter guide.
Common mistakes (and fixes)
- ❌ Skipping the manual entirely. ✅ Three facts minimum: tube sizes, jam procedure, lubrication policy. Photograph those pages.
- ❌ First session with bone-dry bargain tobacco. ✅ The machine gets blamed for the tobacco’s crimes. Squeeze test first, every time.
- ❌ Cramming the hopper “to save refills.” ✅ Level and loose. Compression is the machine’s job, downstream.
- ❌ Re-dialing density every session. ✅ One recipe per tobacco, written down, left alone.
- ❌ Judging the machine by day one. ✅ Days 1–2 are tuition. Judge at the end of week one, after the first clean.
- ❌ No brush in the house. ✅ The 30-second habit needs its tool. It costs a few dollars; buy two.
Pro tips 💡
FAQ
How does an electric cigarette rolling machine work?
A motorized spoon pushes a measured portion of tobacco from the hopper into a pre-made filtered tube mounted on the nozzle. You load, mount, press; the machine meters, packs, and fills in seconds.
Why does my new machine keep jamming?
Almost always tobacco prep: too dry, too damp, stemmy, or crammed into the hopper. Fix moisture and load level before suspecting the hardware — then the jam tool.
What tubes should a beginner use?
King-size filtered tubes from a name brand — universal fit and the fewest tears. 100mm only if your manual explicitly supports it. Full picks in the tubes guide.
How often should I clean it?
Brush the feed slot for 30 seconds after every session; run the 10-minute standard clean weekly if you roll daily. The complete schedule is in the maintenance guide.
How long until I get good sticks?
Usually within the first session once density is dialed; consistently store-bought-looking batches by day three to five. The learning curve is genuinely short.
Is rolling my own cheaper than buying packs?
Typically 50–70% cheaper per stick after equipment. Run your own numbers in the cost calculator — and remember cheaper sticks are still cigarettes; the health math never changes.
The first-session checklist ✅
- ☐ Manual read: tube sizes, jam procedure, lubrication policy.
- ☐ Empty test cycle run — motor sounds smooth.
- ☐ Station set: stable surface, tray, jar, brush within reach.
- ☐ Tobacco prepped: fluffed, de-stemmed, springback passed.
- ☐ Hopper level, tube seated, density centered.
- ☐ Sticks 1–2 = calibration; recipe written down.
- ☐ Batch rolled; leftovers jarred; feed slot brushed.
- ☐ First weekly clean scheduled in the tracker.