Quick answer: a cigarette tube filler (also called a tube injector) packs loose tobacco into pre-made filter tubes, giving you a cigarette that looks like a factory-made one. The fastest and easiest option depends on how many you make: a handheld filler suits a few a day, a tabletop lever filler suits daily use without electricity, and an electric filler is the quickest and least tiring for larger batches. Whatever you choose, well-prepared tobacco and the right tube size matter as much as the machine.
- What is a cigarette tube filler?
- How a tube filler works
- The four main types of tube filler
- Tube filler vs hand-rolling with papers
- Features compared by filler type
- What makes a filler fast and easy
- Getting consistent fills: density explained
- How to choose the right filler
- Step by step: filling tubes by hand
- Step by step: using an electric filler
- Speed tips for faster batches
- Choosing tubes for your filler
- Quick troubleshooting
- Where to look for a tube filler
- Safe setup and storage
- Cleaning and maintenance
- Three filler set-ups
- Pro tips
- Common mistakes (and fixes)
- Tube filler terms, explained
- FAQ
- Buying checklist
- The bottom line
What is a cigarette tube filler?
A cigarette tube filler is a device that pushes a measured amount of loose tobacco into an empty, pre-made cigarette tube — a paper tube with the filter already attached. The result looks much like a factory-made filtered cigarette. Different sellers call the same kind of device a tube filler, tube injector, cigarette injector or filling machine; they all work on the same principle.
Tube fillers are different from rolling machines that roll tobacco inside a loose paper. If you’d rather use papers than tubes, see our guide to roll machines. Everything below is about filling pre-made tubes.
How a tube filler works
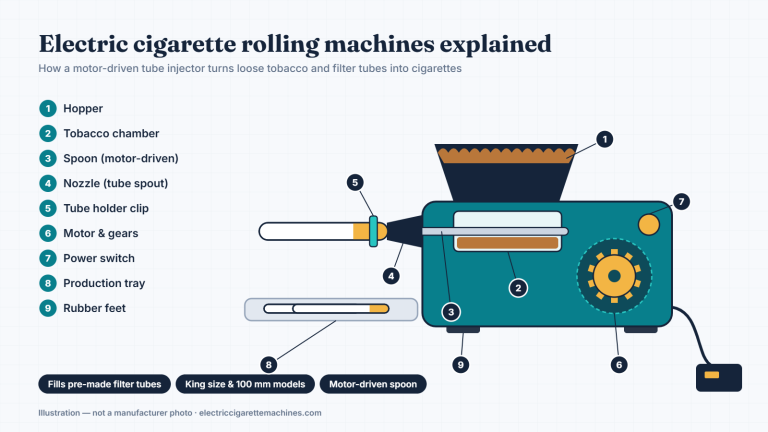
Every tube filler — from a pocket-sized hand tool to an electric machine — uses the same three parts:
- A chamber that holds and shapes a portion of tobacco into a log.
- A spoon (also called a slide or injector rod) that pushes the log forward.
- A nozzle that the empty tube slides onto, guiding the tobacco into the paper.
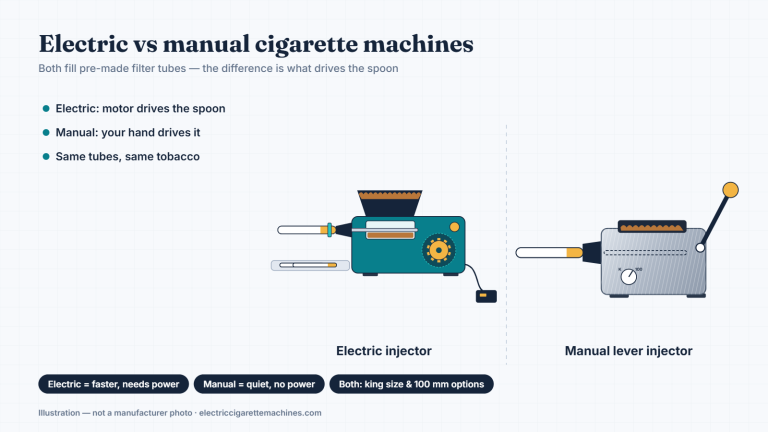
What changes between types is what drives the spoon: your hand on a slider, a lever or crank on a tabletop machine, or an electric motor. That single difference decides how fast, how tiring and how consistent the filling is. Our spare parts guide shows where each of these parts sits.
The four main types of tube filler
| Type | How it’s driven | Best for | Trade-offs |
|---|---|---|---|
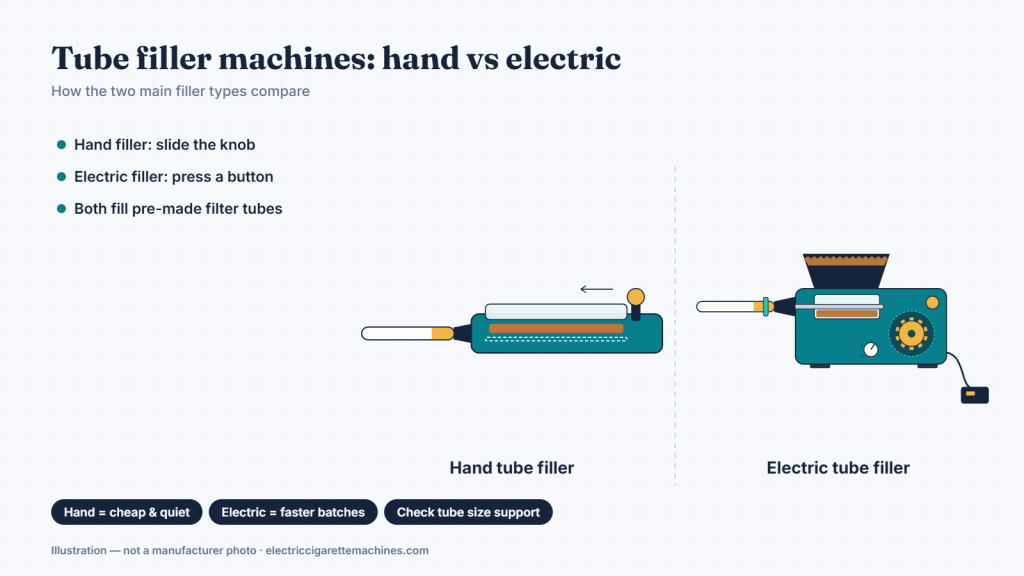
| Handheld slide filler | You load the chamber, close it and push a slider | A few cigarettes a day; travel; first-time users | Slowest per cigarette; consistency depends on your technique |
| Tabletop lever or crank filler | A lever or crank drives the spoon | Daily use without electricity | Takes counter space; some effort per cigarette |
| Electric filler | A motor drives the spoon at the press of a button | Daily or larger quantities; anyone who finds manual filling tiring | Needs power; more parts to clean; costs more |
| Auto-loading electric filler | Motor-driven, with a tube magazine and often a density setting and counter | Batch rolling | Highest cost; bigger machine; more to maintain |
For detail on each class, see our manual injector guide, the Top-O-Matic lever filler guide, the Powermatic 2 electric guide and our automatic machine guide.
Tube filler vs hand-rolling with papers
If you’re deciding between a tube filler and rolling with papers, the main differences are speed, finish and the learning curve:
| Tube filler | Hand-rolling with papers | |
|---|---|---|
| Finished look | Factory-style, with a filter | Hand-rolled; filter only if you add one |
| Learning curve | Short — consistent after a few tries | Longer — takes practice to roll evenly |
| Speed per cigarette | Fast, especially with an electric filler | Slower unless you’re very practised |
| What you buy | Filler plus pre-made filter tubes | Papers (and optional filters/tips) |
| Consistency | High — the chamber measures each portion | Varies with technique |
Features compared by filler type
| Handheld | Lever / crank | Electric | Auto-loading electric | |
|---|---|---|---|---|
| Power needed | No | No | Yes | Yes |
| Effort per cigarette | Highest | Moderate | Low | Lowest |
| Noise | Silent | Quiet | Motor noise | Motor noise |
| Portability | Pocket or drawer | Tabletop | Countertop | Larger countertop |
| Density control | By hand | By hand or chamber reducer | Often adjustable | Usually adjustable |
| Cleaning | Quick | Quick | More parts | Most parts |
| Upfront cost | Lowest | Low to moderate | Moderate to high | Highest |
What makes a filler fast and easy
“Fast” and “easy” come from a handful of design details, not from the label on the box. Compare these before you buy:
| Feature | Why it speeds you up | What to check |
|---|---|---|
| Drive type | A motor removes the slowest, most tiring step | Manual, lever/crank or electric |
| Tube loading | A tube magazine means you aren’t fitting tubes one by one | Single-tube nozzle or auto-loading magazine |
| Chamber or hopper size | Fewer refills per session | How much tobacco it holds per load |
| Density setting | Fewer re-dos from loose or over-packed cigarettes | Adjustable firmness, or a chamber reducer on manual fillers |
| Jam protection | Stops the cycle before a jam turns into a repair | Auto-stop or reverse on electric models |
| Cleaning access | Quick clean-ups keep it running at full speed | Does the chamber open easily? Is a brush included? |
| Tube size support | No slow, frustrating mismatches | King size, 100 mm, or switchable |
Getting consistent fills: density explained
Density — how firmly the tobacco is packed — decides whether a cigarette draws easily, burns evenly and holds its shape. Too loose and it burns fast and the end empties out; too tight and it’s hard to draw and more likely to jam the filler.
- Electric fillers with a density control: start in the middle setting, fill three or four, then adjust one step at a time.
- Manual fillers: control density by how much tobacco you load. Some tabletop models have a chamber reducer for a lighter fill.
- Tobacco cut and moisture change density too: a fine, slightly moist cut packs more tightly than a coarse, dry one at the same setting.
- Tube size matters: 100 mm tubes need more tobacco than king size, so recheck your fill after switching.
How to choose the right filler
- You make a few cigarettes a day, or want something portable: a handheld slide filler. It’s inexpensive, silent and fits in a drawer.
- You fill daily and don’t want to rely on power: a tabletop lever or crank filler. Faster and steadier than a handheld, with no motor to wear out.
- You fill a pack or more at a time, or manual filling tires your hands: an electric filler.
- You batch-fill for the week: an auto-loading electric filler with a tube magazine and density setting.
Still undecided? The Machine Match Quiz asks six quick questions and suggests a type, and our electric vs manual guide goes deeper into the trade-offs. To compare running costs for your own usage, try the cost calculator.
Step by step: filling tubes by hand
- Prepare the tobacco. Fluff it apart so there are no clumps.
- Open the chamber and fill it evenly from end to end — don’t press it down hard.
- Close the chamber firmly so it compresses the tobacco into a log.
- Push a filter tube fully onto the nozzle, holding the filter end so the paper doesn’t slip.
- Slide or pull the spoon in one smooth, steady motion to push the tobacco into the tube.
- Remove the filled cigarette, tap out any loose strands and repeat.
Our step-by-step guide to rolling your own cigarettes with tubes covers technique in more detail.
Step by step: using an electric filler
- Place the machine on a stable, flat surface and plug it in.
- Load the hopper with prepared tobacco — fill to the marked level, not above it.
- Set the density if your model has a control. Start in the middle and adjust after a few cigarettes.
- Fit a tube on the nozzle (or load the tube magazine on auto-loading models).
- Press the button and keep a light hold on the tube until the cycle finishes.
- Remove the cigarette and repeat. Brush out the chamber when you’re done.
Our full guide to using an electric rolling machine covers setup, settings and first-use tips.
Speed tips for faster batches
- Prepare all the tobacco first, then fill — don’t stop and start.
- Line up your tubes filter-side towards you so each one goes straight onto the nozzle.
- Use good-quality tubes in the right size. Thin, cheap tubes tear and cost time — see our cigarette tubes guide and the king size vs 100 mm guide.
- Keep a light, even fill. Over-packing is the most common cause of both jams and slow, effortful strokes.
- Brush the chamber every session. Dust build-up slows the spoon gradually until it jams.
- Use a tray. Catching loose strands saves clean-up time and tobacco.
Choosing tubes for your filler
Tubes affect speed as much as the filler does. A few guidelines:
- Match the length — king size or 100 mm — to the filler’s nozzle or size setting.
- Prefer sturdier paper if you use an electric filler; thin tubes tear more under motor force.
- Keep tubes dry and uncrushed in their box; dented tubes don’t seat properly on the nozzle.
- Try one box before buying in bulk, especially with a new filler.
Quick troubleshooting
| Problem | Likely cause | Fix |
|---|---|---|
| Loose, soft cigarettes | Too little tobacco or a low density setting | Load slightly more or raise density one step |
| Tubes tear or split | Over-packing, thin tubes or a rough nozzle tip | Lighter fill, better tubes, check the nozzle |
| Slider or cycle sticks | Clumped tobacco or dust build-up | Fluff the tobacco, brush the chamber |
| Tobacco left in the chamber | Worn spoon or overfilled chamber | Fill evenly; inspect the spoon tip |
| Tube slips off the nozzle | Tube not fully seated or worn clip | Push the tube fully on; replace the clip |
For anything more serious, use our interactive jam troubleshooting tool.
Where to look for a tube filler
Tube fillers are sold by specialist roll-your-own retailers and on large marketplaces. Wherever you buy, confirm the tube sizes it accepts, whether replacement spoons and nozzles are available, and — for electric models — the voltage and jam protection.
🔍 Search shortcuts for tube fillers
These open Amazon search results — they are not endorsements of specific products. Check tube size, materials and parts availability on each listing.
| Handheld tube fillers | Inexpensive and portable; good for occasional use |
|---|---|
| Electric tube fillers | Fastest for daily use; check jam protection and voltage |
| Filter tubes | Match king size or 100 mm to your filler |
As an Amazon Associate we may earn from qualifying purchases. We don’t list prices or ratings because they change constantly.
Safe setup and storage
- Use a stable, flat surface so the filler can’t tip or slide mid-stroke.
- Unplug electric fillers before cleaning, clearing a jam or changing parts.
- Keep cords and adapters dry and replace any adapter that is damaged or runs hot; use only one that matches the original’s rating.
- Store the filler and tubes somewhere dry and out of reach of children.
Cleaning and maintenance
A clean filler is a fast filler. A few habits keep any type running smoothly:
- Brush the chamber, spoon and nozzle after every session. Tobacco dust is the main cause of sticky strokes and jams.
- Keep it dry. Never rinse a filler; use a dry brush or a barely damp cloth on the outside only.
- Check the spoon and nozzle tip regularly. A rounded spoon or a rough nozzle tip causes loose fills and torn tubes.
- Lubricate only where the manual says. Oil in the wrong place traps dust.
For a full schedule, see our machine maintenance guide, and when a part wears out, the spare parts guide helps you find the right replacement.
Three filler set-ups
These illustrative examples show how different routines map to different fillers. They’re composites of common situations, not individual reviews.
1. The occasional filler
Someone who makes a handful of cigarettes in the evening chooses a handheld slide filler. It costs little, makes no noise and lives in a drawer with a pack of tubes and a small brush. Preparing the tobacco properly makes far more difference to their results than upgrading the tool would.
2. The daily, no-power filler
Someone who fills every day but prefers not to rely on electricity moves up to a tabletop lever filler. The lever does the heavy pushing, the size selector handles both king size and 100 mm tubes, and there’s no motor to wear out.
3. The weekly batch filler
Someone who fills a week’s supply in one sitting chooses an electric filler with jam protection, then later an auto-loading model with a tube magazine. They prepare all the tobacco first, set the density once, and brush the chamber at the end of every session.
Pro tips
- Keep a spare spoon for your filler — it’s the part most likely to wear out.
- Work over a tray to catch strands and keep the area tidy.
- Store prepared tobacco in an airtight container so it stays at a consistent moisture level between sessions.
- Log cleanings and part swaps in our free maintenance tracker.
- Test new tubes or tobacco with a few cigarettes before filling a full batch.
Common mistakes (and fixes)
- Over-packing the chamber. Fix: fill evenly and lightly; let the filler do the compressing.
- Using the wrong tube size. Fix: match king size or 100 mm to the filler’s setting.
- Filling with dry or clumped tobacco. Fix: fluff it and keep it at a consistent moisture level.
- Skipping cleaning. Fix: brush after every session.
- Forcing a stuck stroke. Fix: stop, clear the chamber and try again.
- Not holding the tube while filling. Fix: keep a light grip on the filter end so the tube stays seated.
Tube filler terms, explained
| Term | Meaning |
|---|---|
| Filter tube | An empty, pre-made cigarette paper with the filter already attached |
| Chamber | The compartment that holds and shapes a portion of tobacco |
| Spoon / slide | The part that pushes the tobacco from the chamber into the tube |
| Nozzle / spout | The tip the tube slides onto; guides tobacco into the paper |
| Hopper | The open container on electric fillers that feeds tobacco into the chamber |
| Density | How firmly the tobacco is packed into each tube |
| Chamber reducer | An insert on some manual fillers that makes a lighter, smaller fill |
| King size | The common 84 mm tube length |
| 100 mm | A longer tube that needs more tobacco per fill |
| Jam protection | An electric feature that stops or reverses the motor when it meets resistance |
For more terms, see our complete roll-your-own glossary.
FAQ
What is a cigarette tube filler?
A device that pushes a measured amount of loose tobacco into a pre-made filter tube, producing a cigarette that looks like a factory-made one. It is also called a tube injector or cigarette injector.
Which tube filler is the fastest?
Electric fillers are the fastest for most people, and auto-loading electric models with a tube magazine are quickest for large batches. A well-prepared batch of tobacco speeds up any filler.
Is a manual or electric tube filler better?
Neither is better for everyone. Manual fillers are cheaper, quiet and need no power; electric fillers are faster and less tiring for daily or larger quantities but cost more and need more cleaning.
Why do my tubes tear when I fill them?
Common causes are over-packing the chamber, thin or low-quality tubes, the wrong tube size for the filler, or a nozzle with a rough or damaged tip.
What size tubes do tube fillers take?
Most take king size tubes, and many also take 100 mm tubes, sometimes via a size selector. Always check the filler’s listed tube support before buying tubes.
How often should I clean a tube filler?
Brush out the chamber and spoon after every session and do a deeper clean regularly, following the manual. Most slowdowns and jams come from tobacco dust build-up.
Buying checklist ✅
- ☐ Decided how many cigarettes you fill per session
- ☐ Chosen a type: handheld, lever/crank, electric or auto-loading
- ☐ Confirmed tube size support (king size and/or 100 mm)
- ☐ Checked for a density setting or chamber reducer
- ☐ Checked jam protection and voltage (electric models)
- ☐ Confirmed replacement spoons and nozzles are available
- ☐ Picked up good-quality tubes and a cleaning brush
The bottom line
The fastest, easiest tube filler is the one that matches how many cigarettes you make: handheld for a few, lever or crank for daily use without power, electric for larger quantities, and auto-loading for weekly batches. Pair it with the right tube size and well-prepared tobacco, brush it after every session, and it will stay fast for years.